Showing posts with label Experiments that ROCKED. Show all posts

Friday, June 7, 2013

The Art of the Catch-Up Post!

Hello! I thought I said I was going to be better about blogging... what happened?! Things have been chugging along as the NEW usual for a few weeks now, so let's catch up!

The first thing I'm super excited about makes me sound like a super nerd, but hey... if the shoe fits! Martin has fixed the hole in our living room ceiling! HOORAY! Last May, we met my parents at Mackinaw Island for a great overnight trip, then trekked back to our side of the UP for a little visit. While here, my father and Martin cut open the ceiling to discover what why we were having leaking issues.
Cutting open the ceiling!

Low and behold, there was a HUGE piece of metal pipe sitting in the buckling section of the ceiling! Who know how much longer that would have held?! Dad and Martin discussed how to fix the hole... then it stayed there.... for a year!

The offending pipe!
Well I came home from work one day to Martin hard at work in the garage, and before the end of the day the ceiling (which I often complained about) was fixed! Happy day! Thanks Martin! It may be a bit odd looking, but I don't really care! No more ugly ceiling hole! Now, if we can fix the couch situation, this room will be just about done! Yay!

FINALLY! Hole be gone! 

What else? About a month ago I got accepted to Michigan Tech to start a Teaching English as a Second or Foreign Language (TESOL) program. I literally got the acceptance in the mail on Friday, registered for my first class Saturday, and started on Monday! I'm back to school ya'll! I am a very different student now than I was a decade ago (while I was in college), and I'm probably driving my classmates crazy! I have been able to keep an A through the mid-term Exam we just had (90.5% on that exam!), so I'm going to give it all I got to maintain until the end! I'm shooting for the 4.0 this time!

I'm also super pumped up because I was accepted to participate in a "Fit for Life" Zumba program that one of the local instructors started this summer! Her daughter is fighting leukemia, and the two are related (I can't say how...yet!) in an awesome way. I've committed to attending at least three Zumba classes a week, but I'm aiming for five! Most weeks I end up right in the middle at four! Working on my fitness AND a good cause! Holla!

Martin's car finally gave up the ghost a few weeks ago. It would cost $800 to fix, and now that we are both based at Michigan Tech, we are trying to become a one car family. Hopefully this will help us save money (insurance, gas), and won't drive us TOO crazy. Martin has been a trouper working around my earlier-than-he-goes-to-work schedule AND sticking around while I go to Zumba. He's the best! We'll see how we do this summer and re-evaluate in the fall!

Earlier this week I had a bit of a "milestone" birthday. That's right everyone, I have graduated from my 20's and I'm now the big 3-0! When I was asked how it felt to be thirty, the only thing I could think of was "same as 29!" I haven't really had a problem with starting a new decade. In fact, I have HIGH HOPES for the 30s! I hope to work towards lasting fitness and health, start a family, support Martin as he finishes his PhD and we figure out the next step, get TESOL certified, and (fingers crossed) start/finish a Library Science Masters Degree program! I should totally come back and read these hopes every year and see how I'm doing!

Photo from doedeereblogazine.com
Now, to reward you for reading all the way through this update blog, a Menu Planning Monday.. on Friday! This is the first week in a bit of a "reboot" project that Martin and I are doing. One of the benefits of having insurance is being able to get to a doctor for a wellness checkup. Sadly, I did not really pass that wellness check with flying colors! I'm still working things out with my doctor, and will know more next week, but I'm being proactive! We are cutting back on meat and trying to up our plant based protein. We are trying to cut back on gluten and up our ancient grains. The results? SCRUMPTIOUS! Hooray!


Strawberry Quinoa Salad = Amazing! We loved it so much that I ended up making a second batch later in the week! Our notes: we used "Sweet & Spicy" Pecans from Trader Joe's rather than toasting our own pecans. Also, after crisping the prosciutto, it was rather bacon-like. Might as well save yourself some bucks and just crisp up some bacon instead! The second batch I didn't have feta, so we used the gorgonzola we had left over from last week, and it was equally wonderful (if a bit more fatty)!

Chicken Marsala Casserole has become one of our go to meals! We use orzo pasta in lieu of rice, but now that we are trying to cut back on gluten, we may have to try it with rice. Don't skip the fresh parsley - it adds something! We've made this with skim milk, 2%, and half and half.... all are good! It gets richer (duh) with fat content! 

Crockpot Chicken and Quinoa Enchilada Soup Mmmmm... the flavors are very reminiscent of one of our favorites, White Chicken Chili, but it is broth based and doesn't have a block of cream cheese in it! We added some jalapeno dip and mexican blend cheese on top and it was super duper! I don't have a link for the Tamale Bake, it was the first recipe I ever made from my "Trader Joe" cookbook from my bestie LB! Let me just say... polenta, black beans, zucchini, soy-chorizo, and cheese work in perfect harmony!  

I'll have to let you know how the wheat berry salad is next week! I really AM planning on exploring the "Homemade Pantry" book too! Life kind of threw me for a loop when I started taking classes three weeks after staring my new job, going to three or four (or five) Zumba classes after work, fitting in doctor appointments, and oh yeah, spending time with my husband, cooking... etc! We are working out the kinks of having a set schedule and now only having one car too. I guess we never REALLy stop juggling, huh?

Thursday, August 2, 2012

Ode to My Crock Pot

First off, I am absolutely FLOORED that it has been a month since I last posted! How terrible of me! I have MANY posts in my head that I even took pictures for, and yet, they never got posted! I'll try to get  back on the ball from now on!

Now, since I missed QUITE a few Menu Planning Monday posts, I bet you think that I didn't actually do the planning! WRONG! I have been a planning machine, and I love it! My new favorite cooking machine for the summer? Not the grill (though I do LOVE the grill!), it's MY CROCK POT. It doesn't heat up the whole kitchen, and it is just so darn easy it feels like cheating!

There is something rich and comforting about a slow cooked meal. They are usually familiar flavors and often creamy or slightly heavy. I don't think I would have normally made some of these meals in the summer, but since they don't require me to stand over a hot stove, I'm game! I'm REALLY excited about making these recipes during our ridiculously long winters, let me tell you! But not, enough talk! Let me catch you up on some of our newest experiments, and I'll also throw in a few of our favorites!

Want some summer favorites? Who doesn't love BBQ Ribs or BBQ Pulled Chicken? If you had told me that I could make ribs in my crock pot, I probably would have looked at you sideways - but believe it! They are SO tender and SO yummy! It's a summer delight, that's for sure! The ribs have both a dry rub and sauce when going into the pot. They are finished under the boiler with a lovely sauce made from the liquid in the crock pot. Martin did so much of the work for this while I was off shaking it at Zumba, and it. was. wonderful! We will totally be making this again!

THANK YOU BACK TO HER ROOTS! These are awesome ribs!
This BBQ Chicken was one of the first recipes I EVER made in the Crock Pot, and it quickly became one of our favorites. Great for a party, and totally easy to make into sliders! We followed the suggestions on allrecipes.com and add onion and garlic right away. It really adds some depth! Make it your own ya'll!

Mmm, saucy! :) 

Sure, it's summer, and you probably don't think of soup or chili as a summery dish do you? Well...OK, I have no defense for that! It really is more of a fall and winter food, but I'm a soup junkie, so when I see a new crock pot recipe that appeals to me, I'm going to make it REGARDLESS of the month! We recently made Lasagna Soup and one of my childhood favorites Chicken & Dumplings! We made a Cream Cheese Chicken Chili a few months ago, and it has become a recipe I get STRONG cravings for - really yummy! 

The Lasagna Soup really could become a deconstructed lasagna if you add hearty noodles! One of my favorite bloggers, Cassie, from Back to Her Roots, posted this on her blog (a long time ago), and I'm so glad we decided to make it. Truthfully, I'm not willing to put in the effort to create a lasagna, and this sounded easy... and it was! DO take the time to finish each bowl under the broiler with the ricotta and mozzarella on it - it is totally worth the five minute wait! 

BTHR does it again! I'm a huge fan of her food!
One of my favorite childhood meals HAD to be Chicken & Dumplings. We didn't have it all the time, but when we did, it was such a wonderful treat! I was shocked to see the dumplings for this crock pot version were made from Grands biscuits! I had some serious doubts that this would taste ANYTHING like the dumplings I loved, but I'm happy to report that they do! Because the biscuit is essentially steamed in the chicken stew they don't crisp up at all, and really DO have a dumpling quality. Give it a shot and let me know if you agree! Next time I will be adding some veggies as this is a bit rich for me (though it is actually NOT very calorie-rich, which is a bonus!). Peas will really look nice in here! 

Comfort Food. Enough said!
Last, but never least, our new standard for Chicken Chili! I don't think I need to say much here, you've already heard me rave and rave about this, haha! I'll let you in on a secret though, DO add some extra jalapeno! We didn't the second time we made it, and it was a mistake! The taste was still good, but it just didn't compare! Don't go crazy, we used less than half a jalapeno, and it was only because we had some left over, now I will get one just to add in here!

The BEST Chicken Chili I've ever had!
I'm so glad that I finally posted again, but I have to say it was exquisite torture too! I'm doing a few days of juicing & smoothies right now to try to "reboot" my body and start actually losing weight again, so these are just taunting me, haha! But like the commercial says, "We shall detox... then retox!" I know I'll be making these again soon! 

Yooper Love!

Wednesday, June 27, 2012

Adventures in Canning!

I'm really excited to share our recent culinary adventure - canning! I can say beyond a shadow of a doubt that I would never have even CONSIDERED canning even a year ago! City living is amazing, and man I miss the Logan Square farmer's market more than I can express in words, but I wasn't looking to buy fruits and veggies to store for the winter! In retrospect, I had more organic produce available to me then than I do now, so I probably should have been, huh?! Oh well! I'm a convert NOW, and that counts for something, right?! RIGHT!

So how did this all start anyway? With a virtual book wish list on my Pinterest account of course! I spread the word about the wish list through the best networking tool ever- my mother! :) For my birthday I got three of the books I'd been coveting, and all our experiments came from the absolutely stunning "Food in Jars." (Thanks sister Erin!)
Check out her AWESOME website too: Food in Jars!

My mother's birthday is just six days after mine, and after I got this book I knew IMMEDIATELY that I wanted to try some recipes out and create her gift from our experiments! I poured over the book for over a week trying to figure out what I wanted to try, and ended up marking far more recipes than I could realistically make... but that's okay because it means that I will have more to try out later! 

The first recipe we tried was inspired by our back yard! Hey, remember when we waxed poetic about our rhubarb? Well add this recipe to the MUST MAKE for you rhubarb lovers (and non-lovers!) because it's amazing! Behold, the glory that IS Strawberry-Orange Rhubarb Jam! Holy Moly! The fantastic taste of strawberry and rhubarb with an awesome tart note from orange juice and zest! The flavors are so bright and fantastic - a serious summer in a jar winner! 

OKAY! Now that I've over sold it - here we go! 

My amazing sous-chef Martin chopped his heart out for me! 

Strawberry-Orange Rhubarb Jam
From "Food in Jars" by Marisa McClellan
(Makes 5 Pint Jars - Though we used some half pints for gift giving!)

6 cups chopped rhubarb (about 2.5 pounds)
4 cups chopped strawberries (about 2 pints) 
zest and juice of 2 oranges
5 cups granulated sugar
1 teaspoon ground cinnamon
2 (3 oz) packets liquid pectin

Prepare a boiling water bath and the pint jars, place the lids in a small saucepan and simmer over very low heat. (If this is the first time you are canning, make sure you read up on this process! Also make sure you have all the tools you will want or need!) 

Combine the rhubarb, strawberries, orange zest, juice, sugar, and cinnamon in a large nonreactive pot and stir to incorporate. Bring to a boil then reduce heat to simmer and cook fruit over medium-high heat for 15-20 minutes or until the rhubarb breaks down and the jam has a glossy shine. 

Add the pectin and increase the heat to high, letting the jam boil for five minutes. Remove the pot from the heat and ladle the jam into the prepared jars. Wipe the rims, apply the lids and rings, and process in a boiling water bath for 10 minutes. 

Testing the jam, filling the jars, and processing! 

Okay... seriously? I can't even tell you how worried I was that I was going to do something seriously wrong and that we wouldn't hear the POP! of the tops that we wanted to hear! BUT, soon after removing the jars from the water bath, we heard the awesome ping, ping, pings we were listening for! Hooray! 

I was looking for something fun and different to make, and I saw that there was a recipe for a Zesty Lime Curd included in "Food in Jars!" My mom and I share a lot of tea party, scone, and coffee shop memories, and I know she is a great fan of lemon curd, so I thought this sounded perfect! I have to be honest, Martin made the whole thing, start to finish, and all I did was process it! I was actually working on making the pear butter recipe we made, which we forgot to take any pictures of, but I DID get great pics of the curd! Away we go! 

Martin, hard at work!

Zesty Lime Curd
From "Food in Jars" by Marisa McClellan
(Makes 2 Half Pint Jars... ours made a BIT less than that!)

1/4 cup finely grated lime zest (about 4 limes)
1 1/4 cup granulated sugar
4 large egg yolks 
2 large eggs
1/2 cup freshly squeezed lime juice (about 6 limes)
6 tablespoons unsalted butter, cut into cubes

Prepare a boiling water bath and 2 half pint jars; meanwhile, simmer the lids and rings in a saucepan.

Combine the lime zest and sugar in a bowl, rubbing the zest into the sugar until it is fragrant and combined. Set aside. 

Set up a double boiler (or... you know... two sauce pans that you hold over heat and stir constantly... you rock Martin!) with 2 inches of simmering water over medium heat. Keeping the top half of the double boiler off the stove, add the egg yolks and whole eggs to it and whisk them together. Add the zest and sugar combo and whisk in. Finally, add the lime juice and stir until blended. 

Put the double boiler back together and drop in the cubes of butter. Switch to a silicone spatula and stir continually as the lime curd cooks. Using a candy thermometer, monitor the temperature of the curd while you stire. As is approaches 190-200 F, it should start to thicken. It typically takes 6-9 minutes for a curd to cook (it took us a lot longer because we weren't using a double boiler!). When the curd has thickened to the consistency of sour cream, it is done! Remove the top half of the double boiler and stir off the heat, it will continue to thicken a bit. 

Strain the curd through a fine-mesh sieve into a measuring cup. The straining removes both the zest and any bits of scrambled egg! Pour the curd into the prepared jars, leaving a generous 1/2 inch of headspace. Wipe the rims, apply the lids and rings, and process in the boiling water bath for 25 minutes. 

When the time is up, remove the canning pot from the heat and remove the lid. Let the jars sit in the pot for another 5 minuts, this helps to prevent the curd from reacing to the rapid temperature change and bubbling out of the jars!

My contribution to the process!
Wowza - way more complex that we expected! Martin and I were sweating bullets in our over heated kitchen, and we were NOT expecting to be standing over boiling water for as long as we did! We already have plans to make more of this.... but maybe when the weather is a little cooler since citrus is in season (um... in Florida!) in the winter! 

Want to see the gift we crafted? Here it is!


Happy Birthday Mom!
Of COURSE Martin whipped up a batch of bread to go with our spreads, what else?! All three were big hits, and GUESS WHAT?! We got to bring home my great grandmother's double boiler! I am so excited to try making more curds - oh boy!

Do you can? What are your favorite recipes? Share! :) 


Friday, June 1, 2012

A Fancy Pants Friday!

I may not have been wearing my fancy pants today (in fact I have been in a sweatshirt and track pants pretty much the whole day!), but we sure had a Fancy Pants Feast today! I had today off, and Martin had a few really long days this week, so we totally lazed around this morning and decided to do lunch right!

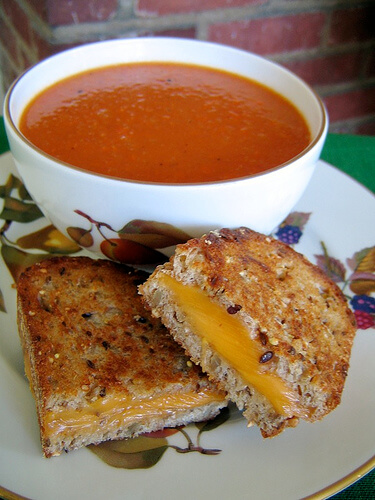
We are big, huge fans of Amy's Chunky Tomato Bisque, and are particularly partial to the light in sodium varietal! We can't find it anywhere around the UP so far, but we were lucky enough to get SIX CANS in the mail in a care package from my parents! Thanks Mom & Dad! :) We knew that we were going to want some of that soup soon, and what goes better with tomato soup than grilled cheese? Nothing. That's what!
The genesis of the Fancy Pants Feast
Now, if you didn't know, I'm absolutely addicted to Pinterest. I actually get mad at myself sometimes because I didn't get on it sooner. When I think of how many ideas I missed out on, how many times I was stuck lesson planning with no inspiration at all... gah! It just makes my head spin! I may not be lesson planning right now, but I sure do make use of it! I have a board dedicated to ideas for my students in the residential program where I work, inspiration boards for decorating, craft ideas all around, and best of all, I have recipes to last for months. Pinterest is my virtual playground! If YOU are a Pinterest freak like me, please feel free to follow me! I'm always on the hunt for new ideas! 

Why did I just babble on about Pinterest? I'll tell you why. Because Pinterest has supplied me with enough grilled cheese varieties that I could open my own version of Melt right here in the western UP! (If you don't know what Melt is, it is the best darn grilled cheese restaurant ever, and you'll find it in the Cleveland area of Ohio. Do visit it. It's tops!) My mouth was just watering at all the glorious ideas for add ins for our toasted cheese sammies that deciding on which ones to try was literally painful! After some debate, we decided that we would be going with the theme of "fruity and fun" this go round. Good. Choice. 

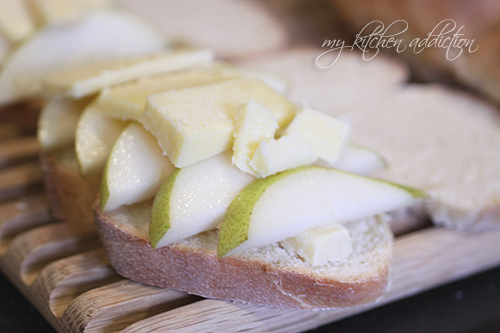
Now, did we have the insight to take pictures of our glorious creations? No, of course not. But I'll gank some random tasty looking grilled cheese pictures from the intrawebs, and you all will play pretend with me that they are authentic, right? Right! Here we go! 


Adapted from Heat to 350 blog post

Slices of Fancy Pants Bread
Apple Butter
Dried Rosmary
Thinly sliced pear or apple
Thinly sliced smoked cheddar cheese
Butter

I really think I'd be insulting your intelligence if I were to put tablespoons and other measurements for this! Look, you make or buy some good crusty bread. Spread some butter on the outside of the bread - you don't need much. Flip the bread over and spread some apple butter and sprinkle some rosemary on top of that. Layer the cheese and pear (which was an accident, but a happy one!). Heat a skillet and cook til golden brown and the cheese is melty. If the sandwich is too thick (ours was!), finish it under the broiler for two to three minutes to melt everything down. Serve and devour immediately!

Oh yes. This is a tasty sammie! I would NEVER have thought to add rosemary, and it is wonderful. Next time I won't mistakenly add pear, but I WILL purposely add apple slices. I think that will be absolutely magnificent. 


I also mentioned on our menu planner that we would be making a version of the sandwich that wooed my sister! Her boyfriend impressed the heck out of her by whipping up this fancy pants grilled cheese for her vegetarian pleasure. It has always sounded yummy, and I'm here to tell you, it is perfect. Just perfect. Excellent work Dan. It would have wooed me too! 


Dan's Woo-ing Grilled Cheese Sandwiches

Some more slices of good bread
Crumbled or Spreadable Blue Cheese (We used Laughing Cow's Blue Cheese)
Shredded of Thinly Sliced Havarti
Thinly Sliced Pear
Handful of Arugula 
Butter 

Take those beautiful slices of bread and butter one side of each. We don't use blue cheese very often, so we decided to use Laughing Cow's Blue Cheese spread. I spread some of the cheese on the non-buttered side, then layered pear, arugula, and havarti. The sandwich will stay together better if you spread a little of the blue cheese on the pear or put the arugula directly on the bread. Top with another blue cheese layered piece of bread, and grill in a hot skillet. Again, if the sandwich is too thick to get the cheese melted and the pear caramelized, put it under the broiler for two to three minutes before serving. 


The bite of the arugula with the sweetness of the pears plus the richness of the cheeses? Divine. Magical even! For us, the spreadable blue cheese was a good choice. It has less fat (as if the rest of the cheese was going to be low fat.. haha!) and only 35 calories per wedge. If you have real blue cheese around, I bet that it would be even better, though I can hardly imagine! So very tasty! 

We're already excited for the next round of Fancy Pants grilled cheeses - next time will be savory! Jalapeno Popper and French Onion Grilled Cheese Sandwiches to be exact! And hey... why DON'T I just open a grilled cheese shop up here - our six months of winter makes it an ideal location! Anyone want to back this superb idea? Hmmm.... time to ponder a restaurant future! (Nah... but it would be a seriously great location for a restaurant like that!)

Until next time - Yooper Love! 

Thursday, May 24, 2012

Martin (and me!) on: Rhubarb

I'm SO excited to welcome my first (and let's face it, probably my only) guest blogger today! My dear husband Martin did something pretty neat-o with some of our rhubarb, so I kindly demanded that he share it with you all! Who's ready for some... rhubarb pickles??

My guest blogger, Martin, displaying his fine work!

Martin: Linnea and I were driving back from Mackinac while she was flipping through a Rachael Ray magazine she hadn't read yet. She pointed out this recipe and I knew I wanted to try it. I made it on a day when she was working for 14 hours (thus no process pictures!), and we've really enjoyed the finished product! 

I think it's a good way to utilize the rhubarb that grows in our backyard. I love anything that is pickled in vinegar, and it sounded easy enough, so I gave it a try. I liked that it didn't have to be the youngest rhubarb, as other vegetables that you pickle often call for bright or young produce. I would describe the taste of the finished product as tart, with a sweet brine, and the ginger gives it a little zip! (Note: Linnea's favorite part is the pickled ginger! We are thinking about using this recipe to pickle our own ginger at home - stay turned for THAT!)

I did an experiment by substituting lemon juice from the zested lemon for the acid rather than the vinegar. We haven't opened that jar yet, but I figure it will just taste a LOT more like lemons. (We'll let you know if this was a GOOD experiment or a BAD experiment when we open it up!)

Quick Rhubarb Pickles
(Makes three jars - 10 oz each)
2 cups cider vinegar
1 1/2 cups sugar
1 1/2 tbsp coarse salt (he used sea salt)
1/2 tsp. yellow mustard seeds
10 whole cloves
10 who black peppercorns
1 piece (1 1/2 inch) fresh ginger, peeled and thinly sliced
1 lemon
1 lb fresh rhubarb, cut crosswise into 3/4 inch pieces

In a nonreactive medium saucepan, combine the vinegar, sugar, salt, mustard seeds, cloves and peppercorns. Cook over medium heat, stirring occasionally, until the sugar is just dissolved, about five minutes. Add the ginger, then use a vegetable peeler to slice strips of zest from the lemon; add to the saucepan. 

Let the liquid cool to room temperature, or about thirty minutes. Divide the rhubarb among three clean, small glass jars. Ladle in the cooled brine mixture. Top with lids and refrigerate the pickles for two days before eating. The pickles will keep refrigerated for up to one month! 

The finished product! Ta-da!

Might I take this moment to thank Martin for (begrudgingly) sharing his kitchen experiment! Thank you sweetie! I would also like to say just how much I LOVE the background of the shot above in the kitchen! I have always been enamored with our built-in cupboard in our kitchen. It used to be where the old wood burning stove lived in the kitchen (once upon a time), and the cupboard ends where the exposed brick fireplace shaft begins! Beautiful AND functional as we use it as storage for our cookbooks - perfection! We just got all the glass jars on the shelves to store our bulk goods from the co-op. Two of the three shelves display grains, lentils, and nuts now! SO pretty! Swoon! And now, back to rhubarb!

I may or may not have bribed my darling hubby to join us here by agreeing to make him a strawberry rhubarb pie. He actually ended up making the pie filling himself while I finished up the blog on yogurt yesterday! I swooped in to make the BEST DARN CRUST in the history of crusts, and to finish up the rest of the pie too. I actually remembered to take pictures, woo hoo! 

A dear friend of the family spearheaded a project to collect favorite recipes from our friends and family as a wedding gift for us. She typed each one up, added graphics, helpful kitchen tips, and quotes, and created a masterpiece of a cookbook for us! My mother submitted my grandmother's crust (the only crust I EVER make) and rhubarb filling recipe to this treasury. Martin and I had some strawberries in the fridge (next time I hope they are from our backyard!) so we decided to make this into a strawberry rhubarb pie... excellent choice my friends. Excellent choice! 

I have NO IDEA how someone could mess up this pie crust, but the quote from my grandmother that accompanies this recipe says, "I do not guarantee my crust recipe as others have tried and failed!" It has NEVER done me wrong, so I hope that you will try it out!

Grandma Strom's Pie Crust  (Measurements for top and bottom crusts)
(Sift/combine ingredients directly into pie plate)
2 cups flour 
2 tsp. sugar
1 tsp. salt

(In a separate bowl)
2/3 cup Wesson oil
3 tbsp. cold milk

Mix oil and milk with a fork, then pour onto flour mixture and mix with hands. Take off about 1/3 for top crust and set aside. Press remaining crust into pie plate. 

Easy peasy! That's it! If you are making a fruit pie, you don't even need to pre-bake it - it will turn golden brown when you cook the pie up! :) I would have taken step-by-step pictures, but my fingers were quite... gross. Here it is before the filling goes in though! 

Mmm! Pie crust & strawberry rhubarb filling just begging to be baked!

Strawberry Rhubarb Filling
2 1/2 cups chopped rhubarb (4 cups if JUST doing rhubarb!)
1 1/2 cups chopped strawberries
1 cup sugar (recipe called for 1 3/4 cups, but we balked at that! One cup was a perfect amount for us!)
2 eggs
4 tbsp flour

Cut pieces to roughly 1/2 inch pieces. Mix flour, sugar, and eggs together and add to strawberry rhubarb mixture. Pour into pie shell.

The flour/egg/sugar mixture makes it look like there is less fruit in here than there actually is!

Crumble remaining crust on top or roll out and cover with lattice strips. Bake at 400 degrees for one hour.

Crumble, crumble, dot, dot!

We kept busy while it was cooking! I did an experiment with the remaining strawberries for a few new summer porridge recipes! The one I tried this morning had 1/4 cup of strawberries, 1 tsp. of vanilla, and 1-2 tsp of honey in it. It was SOOO tasty! I also made one that had 1 tbsp of jam in it. We don't have strawberry jam on hand right now, so I used the last of the Poor Rock Monastery Pincherry jam. I'll let you know how it tastes! The monks run THE BEST bakery/jam shop in the UP called The Jam Pot. We are absolutely addicted to their jam, and gave it as gifts for Christmas just to create a new throng of addicts! :) A MUST VISIT if you are joining us in the copper country! And now, for the fresh from the oven glamour shot:

Oooohhh, Ahhhhh! So perfect!

I had to run to the store to pick up some eggs since we used the last two in the pie, and of course it was a ridiculous trip, as usual. I can NEVER find what I want at the store that is closest to us, which is why we do all our shopping at the co-op and Walmart (I'm ashamed to admit, but it is true!). There are a couple of great grocery stores in the area, but the one near us? TERRIBLE! And expensive! But I will only link using the power of GOOD, not evil, thus I shan't name the store! I did, however, snag us some vanilla ice cream to go with the pie! Best choice ever, duh! 

We are officially pie geniuses! 

I felt a lot of pressure since I made it sound like this was going to be a cornucopia of rhubarb recipes today... and it's so not! SO I did some internet research, and my stars! Someone else has already been there and DONE THAT on their blog, so you should check HER stuff out - because it's awesome! I'm pretty pleased that I did this search because Tasty Kitchen looks like a site that I'm going to truly adore! Enjoy your rhubarb ladies and gents - time for more pie! 

Yooper love!

Linnea AND MARTIN!